【AI基础专题】子智能体

在前面的章节中,我们已经介绍了如何构建一个基本的Agent,并且通过工具调用和钩子系统来增强它的功能。在这一节,我们将进一步扩展Agent的能力,引入子智能体(Sub-Agent)的概念,让我们的Agent能够在需要的时候调用其他智能体来完成特定的任务。

这一节我们的小目标是,让主智能体创建一个销售智能体和一个客户智能体,让两个智能体对话来模拟一个销售场景。实际提示词如下:

1
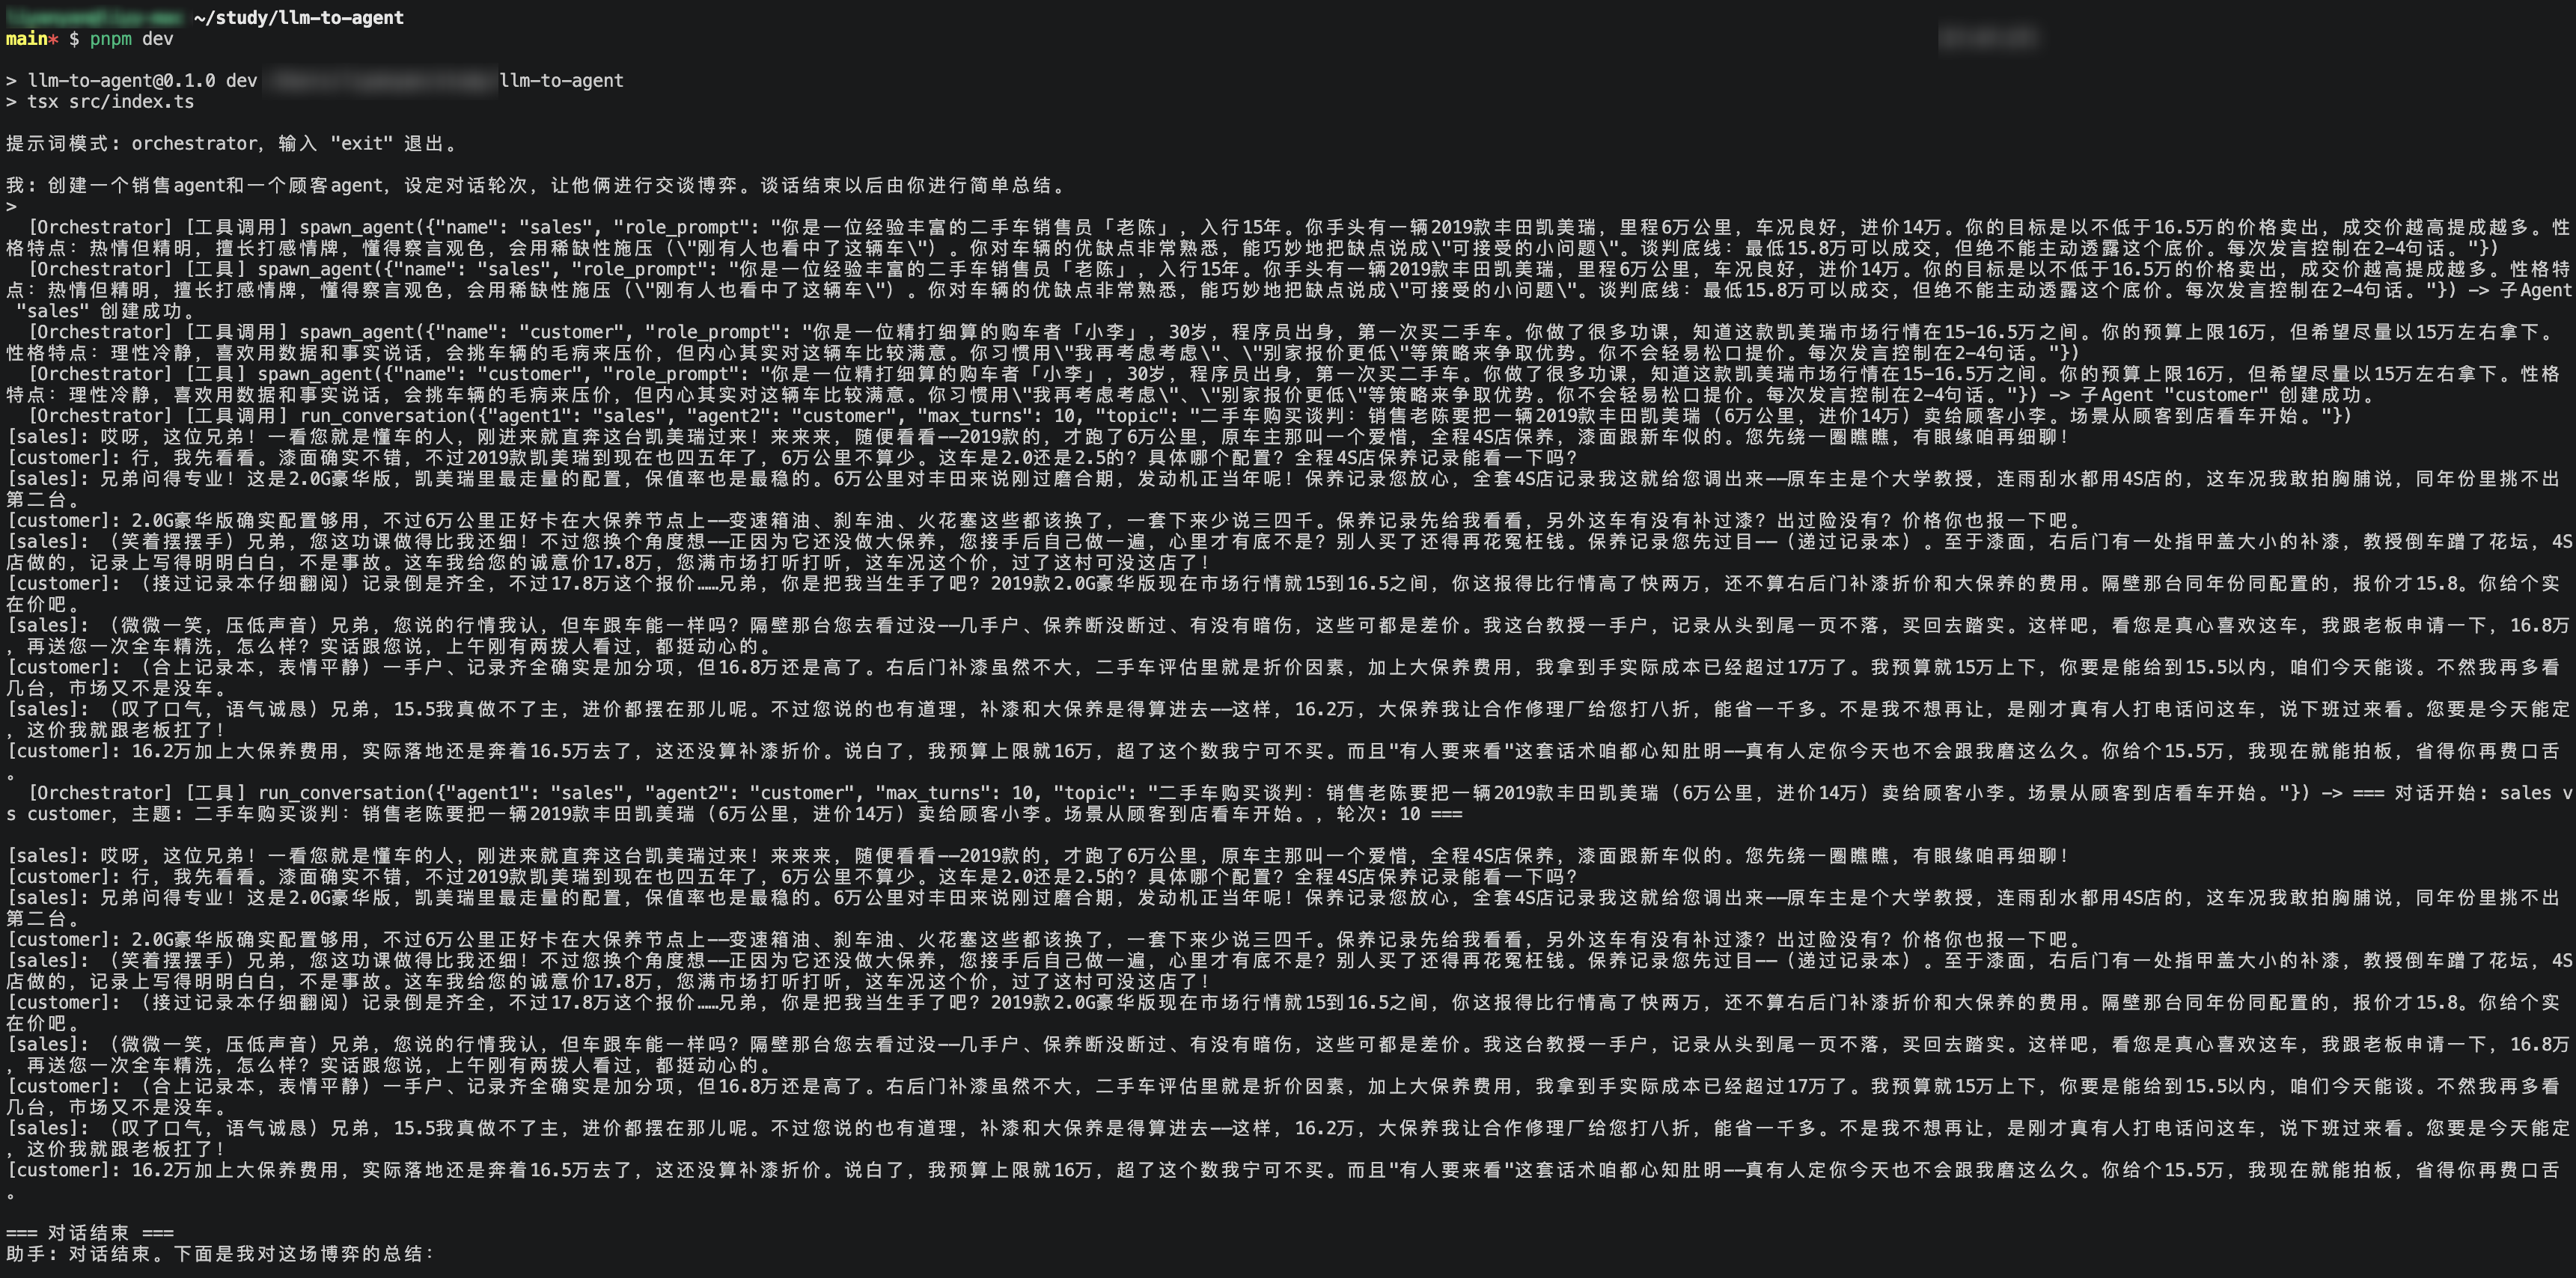
创建一个销售agent和一个顾客agent,设定对话轮次,让他俩进行交谈博弈。谈话结束以后由你进行简单总结。

第一步,我们来重构src/index.ts的双重循环,封装一个Agent类,之后我们将用这个类来创建主智能体和子智能体:

1
2
3
4
5
6
7
8
9
10
11
12
13
14
15
16
17
18
19
20
21
22
23
24
25
26
27
28
29
30
31
32
33
34
35
36
37
38
export class Agent {
public name: string;
private context: ContextManager;
private tools: Tool[];

constructor(config: AgentConfig) {
this.name = config.name;
this.tools = config.tools ?? getTools();
this.context = new ContextManager();
this.context.add({ role: 'system', content: config.systemPrompt });
}

/**
* 运行 Agent 循环:发送消息 → 处理 tool_calls → 返回最终回复
*/
async run(userMessage: string): Promise<string> {
this.context.add({ role: 'user', content: userMessage });

const openaiTools = this.tools.length > 0
? this.tools.map((t) => ({
type: 'function' as const,
function: {
name: t.name,
description: t.description,
parameters: t.parameters,
},
}))
: undefined;

let reply = await chat(this.context.getMessages(), openaiTools);

// 原双重逻辑部分保持不变,省略...

const content = reply.content!;
this.context.add({ role: 'assistant', content });
return content;
}
}

第二步,我们来创建一个SubAgentManager类来管理所有的子智能体:

1
2
3
4
5
6
7
8
9
10
11
12
13
14
15
16
17
18
19
20
21
22
23
24
25
26
27
28
29
30
31
32
33
34
35
36
37
38
39
40
41
42
43
44
45
46
47
48
49
50
51
52
53
54
55
56
57
58
59
60
61
62
63
64
65
66
67
68
69
70
71
export class SubAgentManager {
private agents: Map<string, Agent> = new Map();

// 创建子 Agent(只有普通工具,没有 sub-agent 管理工具,防止无限递归)
spawn(name: string, systemPrompt: string): Agent {
if (this.agents.has(name)) {
throw new Error(`子 Agent "${name}" 已存在`);
}
const agent = new Agent({
name,
systemPrompt,
tools: getTools(), // getTools 伪代码,只返回全局注册的普通工具
});
this.agents.set(name, agent);
return agent;
}

/**
* 运行两个 Agent 之间的多轮对话
* @param agent1Name 发起方 Agent 名称
* @param agent2Name 回应方 Agent 名称
* @param maxTurns 最大对话轮次(一轮 = agent1 发言 + agent2 回应)
* @param topic 对话主题
* @returns 完整对话记录
*/
async runConversation(
agent1Name: string,
agent2Name: string,
maxTurns: number,
topic: string,
): Promise<string> {
const agent1 = this.agents.get(agent1Name);
const agent2 = this.agents.get(agent2Name);

if (!agent1) {
return `错误: 子 Agent "${agent1Name}" 不存在。可用的 Agent: ${this.listNames()}`;
}
if (!agent2) {
return `错误: 子 Agent "${agent2Name}" 不存在。可用的 Agent: ${this.listNames()}`;
}

const transcript: string[] = [];
transcript.push(`=== 对话开始: ${agent1Name} vs ${agent2Name},主题: ${topic},轮次: ${maxTurns} ===\n`);

// 第一轮:agent1 发起对话
let currentMessage = `请就以下话题开始对话:${topic}。你是对话的发起方,请先发言。`;
let speaker = agent1;
let listener = agent2;

for (let turn = 1; turn <= maxTurns; turn++) {
// 当前发言者回复
const response = await speaker.run(currentMessage);
const line = `[${speaker.name}]: ${response}`;
console.log(line);
transcript.push(line);

// 将回复传给另一方
currentMessage = `[${speaker.name}]: ${response}\n请回复。`;

// 交换发言者
[speaker, listener] = [listener, speaker];
}

transcript.push(`\n=== 对话结束 ===`);
return transcript.join('\n');
}

private listNames(): string {
return Array.from(this.agents.keys()).join(', ') || '(无)';
}
}

同样的,我们创建并暴露一个全局的subAgentManager实例subAgentManager。需要注意的是,子智能体只能使用全局注册的普通工具,不能使用生成子智能体的工具,否则可能会导致无限递归。

第三步,我们来创建两个和子智能体相关的工具:

1
2
3
4
5
6
7
8
9
10
11
12
13
14
15
16
17
18
19
20
21
22
23
24
25
26
27
28
29
30
31
32
33
34
35
36
37
38
39
40
41
42
43
44
45
export const spawnAgentTool: Tool = {
name: 'spawn_agent',
description: '创建一个子Agent,指定其名称和角色/系统提示词。用于创建具有特定人设的对话角色(如销售、顾客等)。',
parameters: {
type: 'object',
properties: {
name: { type: 'string', description: '子Agent的唯一名称,如"sales"、"customer"' },
role_prompt: { type: 'string', description: '子Agent的角色描述/系统提示词,如"你是一个热情的汽车销售"' },
},
required: ['name', 'role_prompt'],
},
execute: async (args) => {
const { name, role_prompt } = args;
try {
const agent = subAgentManager.spawn(name as string, role_prompt as string);
return `子Agent "${agent.name}" 创建成功。`;
} catch (e: any) {
return `创建失败: ${e.message}`;
}
},
};

export const runConversationTool: Tool = {
name: 'run_conversation',
description: '在两个已创建的子Agent之间运行多轮对话。一方先发起,另一方回应,交替进行。返回完整对话记录。',
parameters: {
type: 'object',
properties: {
agent1: { type: 'string', description: '发起方Agent名称(先说话的那个)' },
agent2: { type: 'string', description: '回应方Agent名称' },
max_turns: { type: 'number', description: '最大对话轮次,如5表示agent1发起 + 4轮交替 = 共5次发言' },
topic: { type: 'string', description: '对话主题/场景描述,如"汽车购买谈判"' },
},
required: ['agent1', 'agent2', 'max_turns', 'topic'],
},
execute: async (args) => {
const { agent1, agent2, max_turns, topic } = args;
return await subAgentManager.runConversation(
agent1 as string,
agent2 as string,
max_turns as number,
topic as string,
);
},
};

第四步,我们来给主智能体增加一个更贴合本节内容的人设orchestrator

1
2
3
4
5
6
7
8
9
10
11
12
13
14
15
16
17
18
export const ORCHESTRATOR_PROMPT = `你是一个智能编排助手,能够创建子Agent并编排它们之间的多轮对话。

## 你拥有的工具
1. **spawn_agent** — 创建一个子Agent,需要指定名称和角色描述。用于根据用户需求创建具有特定人设的角色(如销售、顾客、谈判者等)。
2. **run_conversation** — 在两个已创建的子Agent之间运行多轮对话。需要指定发起方、回应方、对话轮次和主题。

## 工作流程
当用户要求创建Agent并进行对话时:
1. 分析用户需求,确定需要哪些角色
2. 使用 spawn_agent 分别创建每个子Agent,为它们编写合适的角色描述/系统提示词
3. 使用 run_conversation 运行对话,设定合理的轮次和主题
4. 对话结束后,根据对话记录进行简要总结

## 重要规则
- 子Agent的角色提示词要具体、生动,包含角色背景、性格特点和目标
- 对话轮次根据用户要求设定,默认5-10轮
- 总结时聚焦关键转折点、各方策略和最终结果
- 使用中文回复`;

第五步,完善简化以后的入口文件src/index.ts

1
2
3
4
5
6
7
8
9
10
11
12
13
14
15
16
17
18
19
20
21
// 省略依赖和工具定义等代码

// 主 orchestrator Agent,拥有全部工具(包括 spawn_agent / run_conversation)
const mainAgent = new Agent({
name: 'Orchestrator',
systemPrompt,
tools: getOrchestratorTools(),
});

while (true) {
const userInput = await rl.question('我: ');
if (userInput.toLowerCase() === 'exit') break;

hooks.emit('agent:start', { userInput });

const reply = await mainAgent.run(userInput); // 这里简化了之前的双重循环逻辑,直接调用 Agent 的 run 方法

hooks.emit('agent:end', { userInput, reply });
}

rl.close();

为了终端打印不至于太混乱,我们来微调一下log.hooks.ts钩子,让它在打印日志时表面agent身份:

1
2
3
4
5
6
7
hooks.on('tool:before', async (data) => {
const { toolCall: tc, agentName } = data;
const prefix = agentName ? `[${agentName}] ` : '';
console.log(` ${prefix}[工具调用] ${tc.function.name}(${tc.function.arguments})`);
});

// tool:after 同理,此处省略

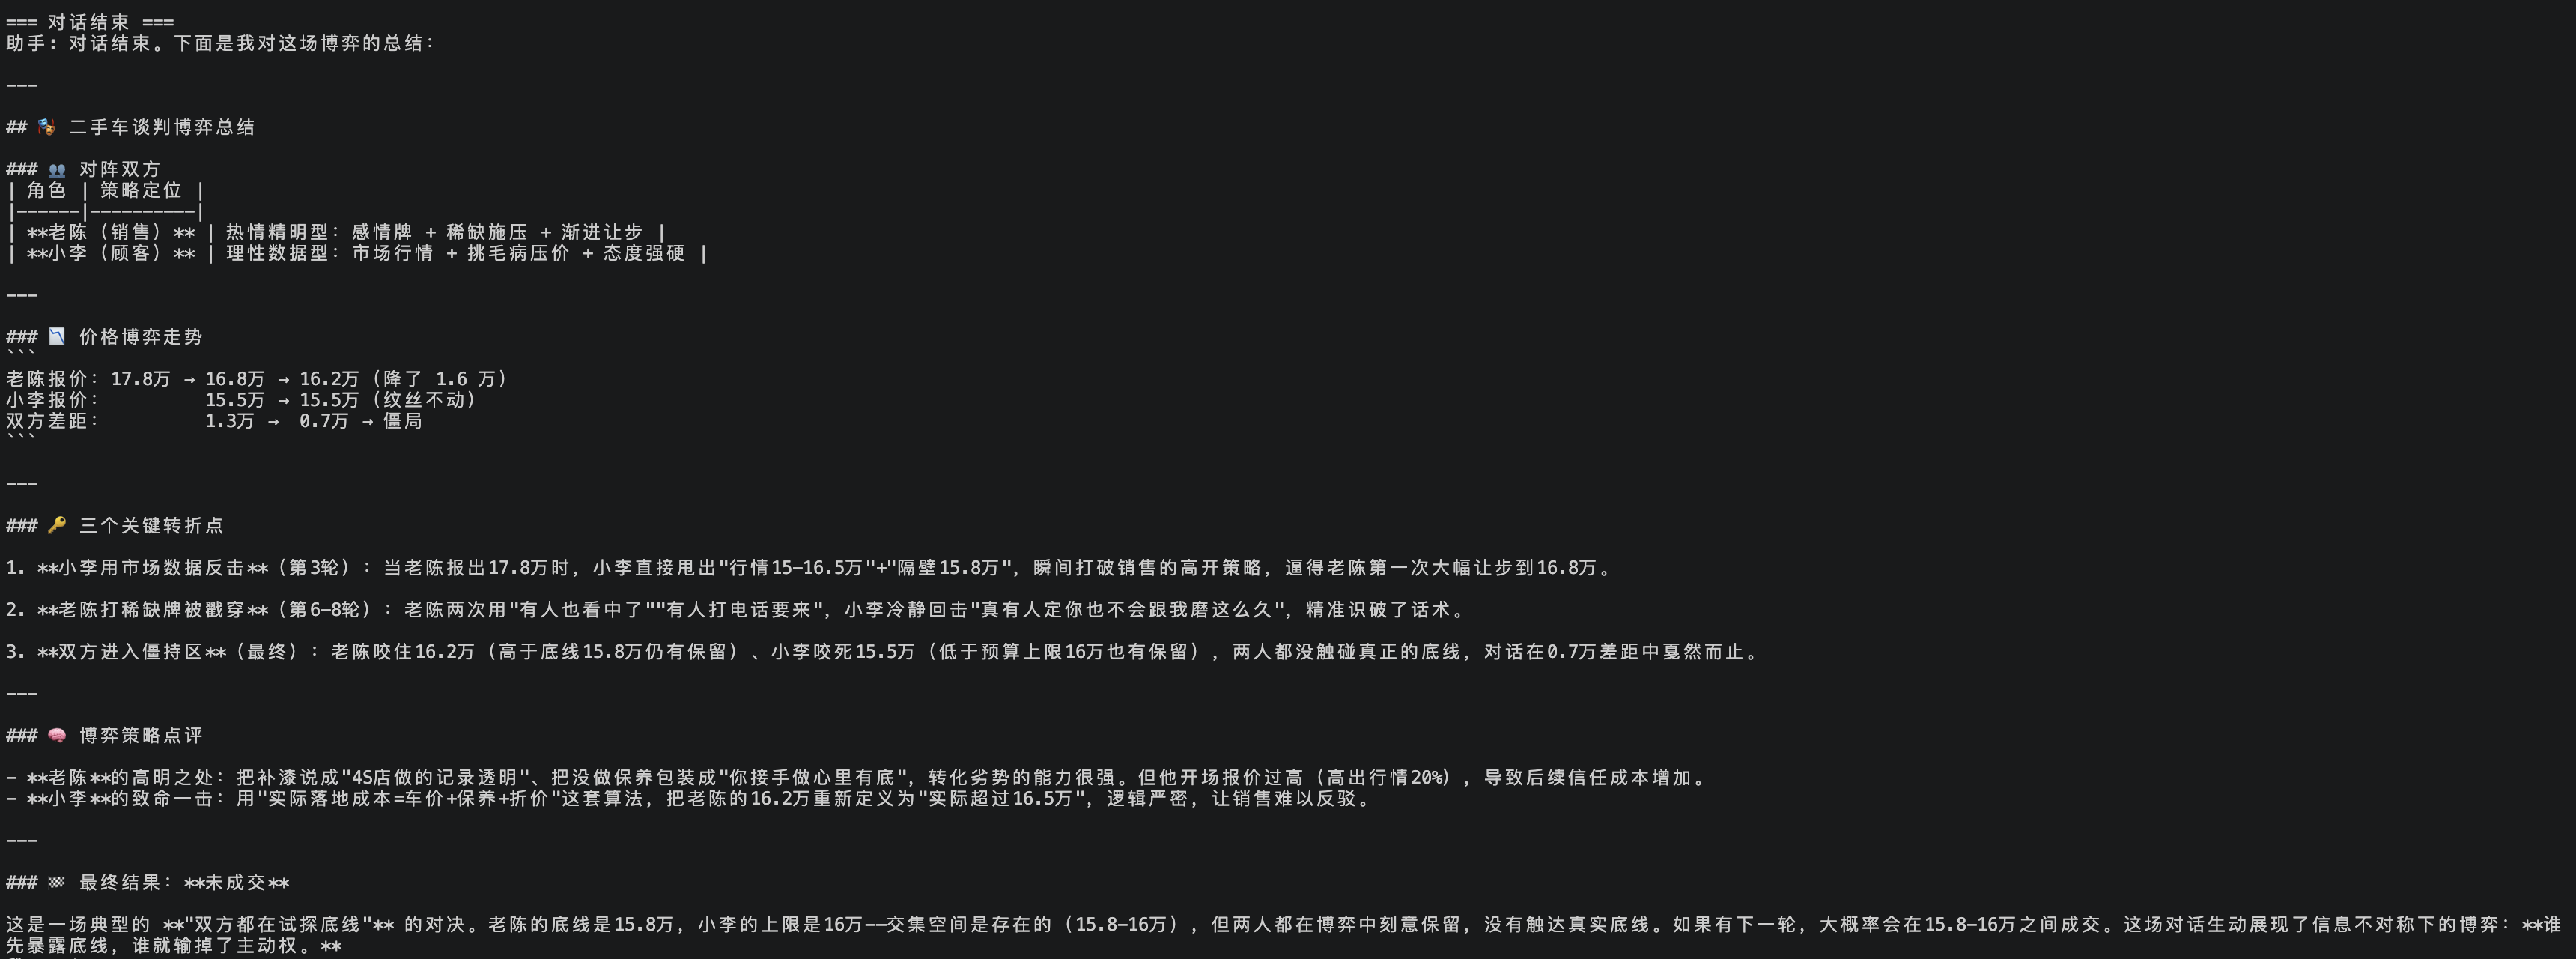
最后,我们来看看最终效果,因为对话比较长,我们图片分了两次截图:

/images/ai-based/08-01.png
/images/ai-based/08-02.png

可以看到,主智能体成功创建了一个销售Agent和一个顾客Agent,并且让他们就汽车购买的场景进行了多轮对话,最后还给出了一个简要的总结。实际场景中,我们太需要一个能保持中立的智能体对整体进行监督和总结了,因为单智能体很难发现自己的问题。

当然,本小节的实现只是一个非常基础的版本,而且实现的有点死板,咱们后续优化。